
By Keith Wilson, B.Comm., PMP, MCT, MCTS
Project Server Black Belt
Senior Trainer and Consultant, IIL
Project success means delivering your goods, service or result by meeting the expectations with respect to the project constraints (Scope, Quality, Resources, Time and Cost). A recent study of technology projects found that 94% of projects had to go through a restart, which impacts schedule and budget significantly.
This post provides valuable insight for managing the Constraints through a process that builds on Microsoft Project’s schedule calculation engine. To understand this, we have broken it down into the six key drivers that impact the calculation of time (start and finish dates) in Microsoft Project. Understanding Microsoft Project’s calculation tools will provide you with a framework to develop and maintain plans effectively, give you the necessary tools for troubleshooting, and allow you to manage the impact of change and eliminate the majority of problems you may encounter when optimizing your plan. The six key scheduling drivers include:
- Project Start Date
- Calendars
- Task Constraints & Deadlines
- Task Durations
- Task Dependencies
- Resource Assignments & Task Types
1. Project Start Date (or Finish Date)
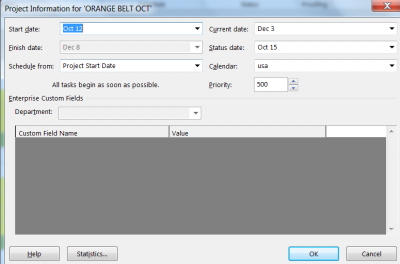
As the first key driver in an effective project planning process, the Project Start Date is used in Microsoft Project as the initial reference and starting point for all new tasks to be defined and entered into its schedule calculation engine. When you start a new project, the default is to apply the current system date as the project start date. However, it is important to define this date as accurately and realistically as possible since it will serve as the initial reference point for other calculations. This seemingly simple step can have a significant downstream impact as the interdependencies of related tasks and resources start to multiply. You can change the project start date at any time to model “what if” scenarios such as delaying or moving up the start of a project. In fact easy “what if” modeling is not only a critical step in setting up project plans, but it is also a very powerful tool that can be used to effectively recalculate your entire plan if a critical variable should change such as resource availability.
To define your project start date, follow these steps:
- On the Project tab click Project Information
- In the Start date box, type or select the project start date.
2. Applying Calendars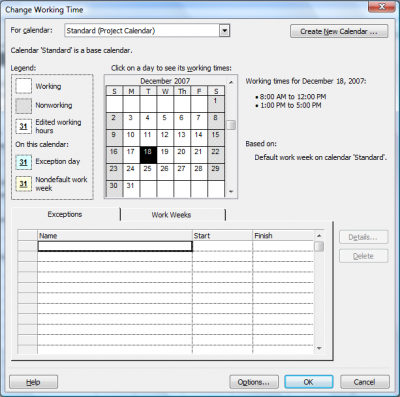
Another key factor in the calculation time is based on creating and applying calendars. Calendars can be applied at the project, task or resource level. The project calendar can be selected and applied in the Project Information box. You can also use project calendars to simulate “what if” scenarios. For example, if you were on a tight schedule and you wanted your staff to work on Saturdays you could set up a new base calendar and apply it to the project to see the impact this may have on the timeline. To create a new calendar, use the following approach:
- On the Project Tab select Change Working Time
3. Task Constraints & Deadlines
One of the most common mistakes made in scheduling with Microsoft Project is to enter the dates directly into the start or finish date fields. This will actually set-up a schedule based on task constraints and seriously limit your ability to use Microsoft Project as a dynamic scheduling tool. Instead of constraints to drive your schedule, you should focus on setting up a network of tasks with dependencies driving when a task should start in conjunction with these other tools. However, task constraints can come in handy when there is a hard coded date such as a tradeshow, regulated deadlines, contract constraints, and so on.
Microsoft Project defaults to “As Soon As Possible” for new tasks. For the most part you should try and have the majority of your tasks stay “As Soon As Possible” with a few exceptions for fixed date tasks such as training, executive briefing, and site visits. This way when it comes time to make changes and do “what if” scenarios, you can let the tool recalculate each task start and finish dates automatically. If your tasks are all constrained, you will have to reenter the new dates manually for tasks that are impacted by any changes. Task constraints may also have a significant impact on your critical path calculations limiting your ability to manage the project life cycle. However, constraints are very useful tools but should be used wisely and with caution. The following table describes how each constraint behaves:
| Constraint | Description |
| As Late As Possible (ALAP) | Schedules the task as late as it can occur in the schedule without delaying subsequent tasks. Do not enter a constraint date with this constraint. |
| As Soon As Possible (ASAP) | Schedules the task to begin as early as it can occur. This is the default constraint for tasks. Do not enter a constraint date with this constraint. |
| Finish No Earlier Than (FNET) | Schedules the task to finish on or after the constraint date. Use it to ensure that a task does not finish before a certain date. |
| Finish No Later Than (FNLT) | Schedules the task to finish on or before the constraint date. Use it to ensure that a task does not finish after a certain date. |
| Must Finish On (MFO) | Schedules the task to finish on the constraint date. Sets the early, scheduled, and late finish dates to the date you type, and anchors the task in the schedule. |
| Must Start On (MSO) | Schedules the task to start on the constraint date. Sets the early, scheduled, and late start dates to the date you type, and anchors the task in the schedule. |
| Start No Earlier Than (SNET) | Schedules the task to start on or after the constraint date. Use it to ensure that a task does not start before a specified date. |
| Start No Later Than (SNLT) | Schedules the task to start on or before the constraint date. Use it to ensure that a task does not start after a specified date. |
You can also apply task deadlines to help manage project or task finish dates. Select a deadline date in the Task information box on the advanced tab, and Microsoft Project will not constrain the task and anchor it in place but rather recalculate the task and compare it to the deadline. Depending on which constraint you select, it may override other calculation tools such as project calendars and task dependencies. The “Must Start On” and “Must Finish On” constraints are the two strongest and will anchor the task in place, even on a non-working day. The figure below illustrates the use of a deadline represented by the green arrow which allows the milestone to continue to move dynamically yet calculate the positive or negative slack to help determine how far off schedule you may be.

4. Duration
Estimating task durations will obviously have an impact on the calculation of start and finish dates. It is important to remember that task durations can be entered directly into the duration field on any table or dialogue box that has the field displayed. Keep in mind that duration is based on working days as defined in the project calendar. For example, 1 day = 8 hours, 5 days = 1 week, 20 days = 1 month. If you wanted to enter 1 month in the duration field, and you type in 30 days, it would actually be calculated as 6 weeks.
Since this post is concerned with the key calculation drivers of schedules in Microsoft Project, it assumes that the work breakdown structure (WBS) is already established as this will in turn drive the creation of schedules. Therefore, prior to working on creating a schedule in Project you must have already entered the phases, tasks, and milestones into the task name column.
Use the new multi-level undo ![]() feature in Microsoft Project to give you peace of mind as you make changes to your schedule. You can always undo and redo what you have entered. This allows for more efficient planning while conducting “what-if” scenarios in a more meaningful way without having to save back-ups or multiple versions of your plan.
feature in Microsoft Project to give you peace of mind as you make changes to your schedule. You can always undo and redo what you have entered. This allows for more efficient planning while conducting “what-if” scenarios in a more meaningful way without having to save back-ups or multiple versions of your plan.
5. Dependencies
One of the most critical steps in scheduling is to establish a network for your tasks by setting task dependencies. This step in scheduling will make the difference between a plan that can be used as a dynamic scheduling tool and a plan that can be used as a presentation tool upfront and then put aside during implementation. Once the dependencies are set, and the network is established you can easily identify the critical path and understand the driving factors to the project end date. You can also make changes to one task and immediately see the impact it will have on the rest of the plan like a ripple effect. Taking advantage of key features in Microsoft Project such as the multi-level undo, show change highlighting, and task inspector makes setting up your network more efficient while helping to ensure the accuracy of your schedule.
The challenge project managers have is to ensure that all tasks are in the network. A best practice to follow is that every task should have a predecessor unless it is driven by the start date of the project and every task should have a successor unless it is the last task or milestone in the project. Consider including a project complete milestone in your plan to link other tasks or milestones.
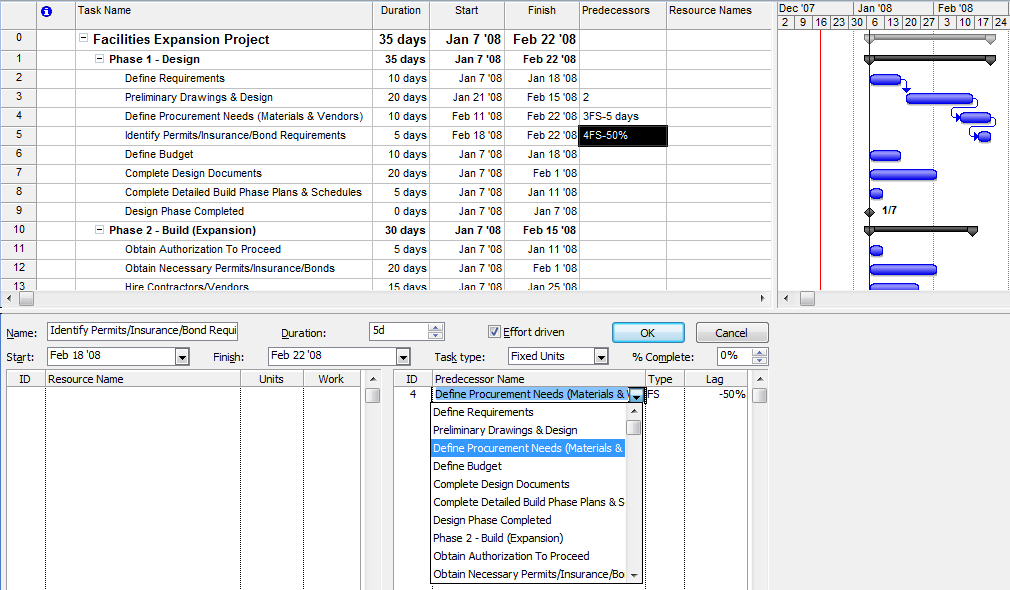
Select a predecessor task from the drop down list. The default type is Finish to Start (FS). Enter lag (in days or %) to create overlapping tasks or gaps between tasks.
You can also type the dependency directly into the predecessor column, making note that this column is driven by the ID number located in the far left side of the table. A quick and easy way to set dependencies is to use the link tool by highlighting a series of tasks and the network will be set-up automatically in a sequential (finish to start) manner. You can even multi-select tasks not in sequence by holding down the control key and subsequently clicking on the link tool from the toolbar.
6. Resource Assignments
One major contributor to the calculation of start and finish dates is the manner in which you assign resources to tasks and what corresponding task type settings have been set. The first thing to understand is that there are three variables being calculated each time a resource is assigned to a task. These variables are tied together in a formula based on Work = Duration * Units. If you change one variable, then one of the other two variables will be recalculated depending on what task type has been applied to that task.
Selecting the task type will be driven based on the scheduling technique you want applied to that task or project. There are two main approaches to scheduling: A duration based approach and an effort based approach. Duration based scheduling is a method generally applied to tasks that are driven by dates and deadlines which will not be impacted by the amount of resources assigned. A good example of this would be a tradeshow. No matter how many resources you assign to the tradeshow, the duration will always be the same.
Duration based scheduling is equivalent to setting the task type to Fixed Duration either as the default and/or for each task. To set a Fixed Duration task as the default follow these steps:
- On the Tools menu, click Options.
- On the Schedule tab select the Default task type drop down list, click Fixed Duration.
For duration driven tasks, you may want to consider turning the effort driven option off (not checked). If you leave it checked, work will remain constant within the fixed duration time period (as per the duration estimate) and be redistributed each time there is a resource change based on the original work calculation. It is better to set the default task type before adding tasks, otherwise you will have to rework the plan and change each task type setting after they have been entered. Changing the default task type after will only affect new tasks, not existing ones. You can also set the task type on a task by task basis either in the split screen view or in the Task Information box under the advanced tab.
Effort based (driven by work) tasks are those in which the duration will be recalculated based on the amount of resources assigned. The more resources assigned to a task, the less time will be calculated in the duration field. The opposite is also true. As you assign fewer resources, duration will increase. The so-called “stuffing envelopes” approach can apply to a variety of tasks. To set the task default to recalculate duration based on resource assignment, follow the same approach for Fixed Duration as previously explained but instead, select Fixed Work (by default the Effort driven will be checked for each task) or select Fixed Units with Effort driven checked.
Assigning resources in Microsoft Project has never been easier. First you can build your resource pool in the resource sheet and subsequently assign them to tasks in the Gantt chart. To build your resource pool, click on the Resource Sheet View and enter the different types of resources whether they are named, generic, equipment, material or, new to Microsoft Project, cost resources.

Once the resources have been created in the resource sheet, you can easily assign them to tasks using the Assign Resources tool ![]() from the toolbar or the split screen view or the drop down list from the Resource Name column.
from the toolbar or the split screen view or the drop down list from the Resource Name column.

Split Screen View: Pay attention to the units and work details. Depending on task type and number of resources assigned your schedule will be recalculated automatically.
If you use the drop down list or the Assign Resource box your assignment defaults to 100% or 1 unit.
If you do use the Assign Resource dialog box, you can multi select tasks with the control key and assign multiple resources to multiple tasks at one time. This makes it very efficient to make resource assignments.
Conclusion
Using the right tool for the job will increase your ability to achieve success on projects and be a more effective Project Manager. Understanding the key drivers to scheduling in Microsoft Project will go a long way to ensuring your success when not only setting up your schedule but also managing the impact of change. Keeping in mind there will always be competing trade-offs between scope, time and cost (resources) on any project, the more you learn about managing these factors the more productive and success you will achieve.
Learn more about IIL’s Microsoft Project and Project Server training at www.iil.com.
 Keith Wilson is a Microsoft Project and Project Management Senior Consultant/Trainer for International Institute for Learning, Inc. His background includes over 25 years of successful management and consulting experience, with a focus that includes project management, training, and business planning. Well known for his public speaking skills and enthusiasm, he has been a welcomed facilitator at numerous Fortune 500 corporations, Universities and Associations worldwide.